rotate video 180 degrees?
rotate video 180 degrees?
Is it possible to rotate the video 180 degrees? The way I had to mount the cameras in my case has the image upside down.
Re: rotate video 180 degrees?
Found it! I added this to the script:
Code: Select all
camera.rotation = 180-
Realizator

- Site Admin
- Posts: 900
- Joined: Tue Apr 16, 2019 9:23 am
- Contact:
Re: rotate video 180 degrees?
Please notice, that if you are working in stereoscopic mode, this rotation is implemented to each camera image independently, but not for the final stitched stereoscopic image. It means that this rotation actually swaps your left and right cameras.
Eugene a.k.a. Realizator
Re: rotate video 180 degrees?
When I added this code in the scripts and then ran through steps 1 to 6 the final depth map is completely trash so it doesn't look like it worked.
Any suggestions on how to rotate the image 180 degrees? Here's a picture of how they are mounted. The connector on each camera is on the top. It seemed like the most natural way to mount it but it made all the scripts show up upside down.
Any suggestions on how to rotate the image 180 degrees? Here's a picture of how they are mounted. The connector on each camera is on the top. It seemed like the most natural way to mount it but it made all the scripts show up upside down.
- Attachments
-
- IMG_20191010_102012.jpg (3.17 MiB) Viewed 12129 times
-
Realizator
- Site Admin
- Posts: 900
- Joined: Tue Apr 16, 2019 9:23 am
- Contact:
Re: rotate video 180 degrees?
As you mentioned 6 scripts, I can suggest you're using a code from this repo: https://github.com/realizator/stereopi-tutorial
If you look inside the first script, you can find this row:
This option do horizontal flip for each image.
You can also use another option:
This will flip image vertically.
If you look inside the first script, you can find this row:
Code: Select all
camera.hflip = TrueYou can also use another option:
Code: Select all
camera.vflip = TrueEugene a.k.a. Realizator
Re: rotate video 180 degrees?
I flipped the case upside down, removed the rotation = 180 code and ran through everything again. On the calibration step the final two calibrated images look fish eye (this is a V2.1 Raspberry Pi Cam, no fish eye).
-
Realizator
- Site Admin
- Posts: 900
- Joined: Tue Apr 16, 2019 9:23 am
- Contact:
Re: rotate video 180 degrees?
Can you please upload your folder with images used for calibration to Google drive (or alternative storage) and share it with me? I'll try to analyze them.
Eugene a.k.a. Realizator
Re: rotate video 180 degrees?
I'll try the flip options but for now I've got the case flipped upside down. When I run script 5 it's not taking a picture of what's currently in front of the camera. It's using photo.png from scenes but it's way zoomed in. How do I take a new stereo picture and have script 5 use it?
Also I don't see anything documented on how to save video to a file.
Also I don't see anything documented on how to save video to a file.
Re: rotate video 180 degrees?
https://drive.google.com/open?id=1fVzBF ... y_divAcHqBRealizator wrote: ↑Thu Oct 10, 2019 7:31 pmCan you please upload your folder with images used for calibration to Google drive (or alternative storage) and share it with me? I'll try to analyze them.
-
Realizator
- Site Admin
- Posts: 900
- Joined: Tue Apr 16, 2019 9:23 am
- Contact:
Re: rotate video 180 degrees?
From the first view I see your left image is actually right image (after all rotation/flip procedures).
You need to fix it in script 4. You can do it in a lot of places. For example, in rows 55 and 56 you can "swap" them. That is replace this code
to this:
Also I see some issues with sticking chessboard, and in some cases chessboard is too far from the camera. As a rule, in such a cases calibration script can not find chessboard on the image, or find it incorrectly. By the way, are chessboard corners highlighted correctly while import procedure in the 4th script?
Tomorrow I will have access to my test equipment, and I can give you come more details after running a scripts on your set of photos.
You need to fix it in script 4. You can do it in a lot of places. For example, in rows 55 and 56 you can "swap" them. That is replace this code
Code: Select all
  leftName = './pairs/left_'+str(photo_counter).zfill(2)+'.png'
rightName = './pairs/right_'+str(photo_counter).zfill(2)+'.png'Code: Select all
  rightName = './pairs/left_'+str(photo_counter).zfill(2)+'.png'
leftName = './pairs/right_'+str(photo_counter).zfill(2)+'.png'Tomorrow I will have access to my test equipment, and I can give you come more details after running a scripts on your set of photos.
Eugene a.k.a. Realizator
-
Realizator
- Site Admin
- Posts: 900
- Joined: Tue Apr 16, 2019 9:23 am
- Contact:
Re: rotate video 180 degrees?
cjonesy20, i did some experiments for you.
As I have a lot to say, let me post my answer in a several consequent posts here.
1. Experiment conditions
For this test I used micro SD with fresh-recorded image downloaded here.
This image contains code from https://github.com/realizator/stereopi-tutorial, and here is related article in our blog.
I DID NOT change any code. I just deleted both "pairs" and "scenes" folders with images, and put two these folders from your link.
2. After step 1:
I did "cd stereopi-tutorial" and run this command:
Here is the result:
Here is a full screenshot:
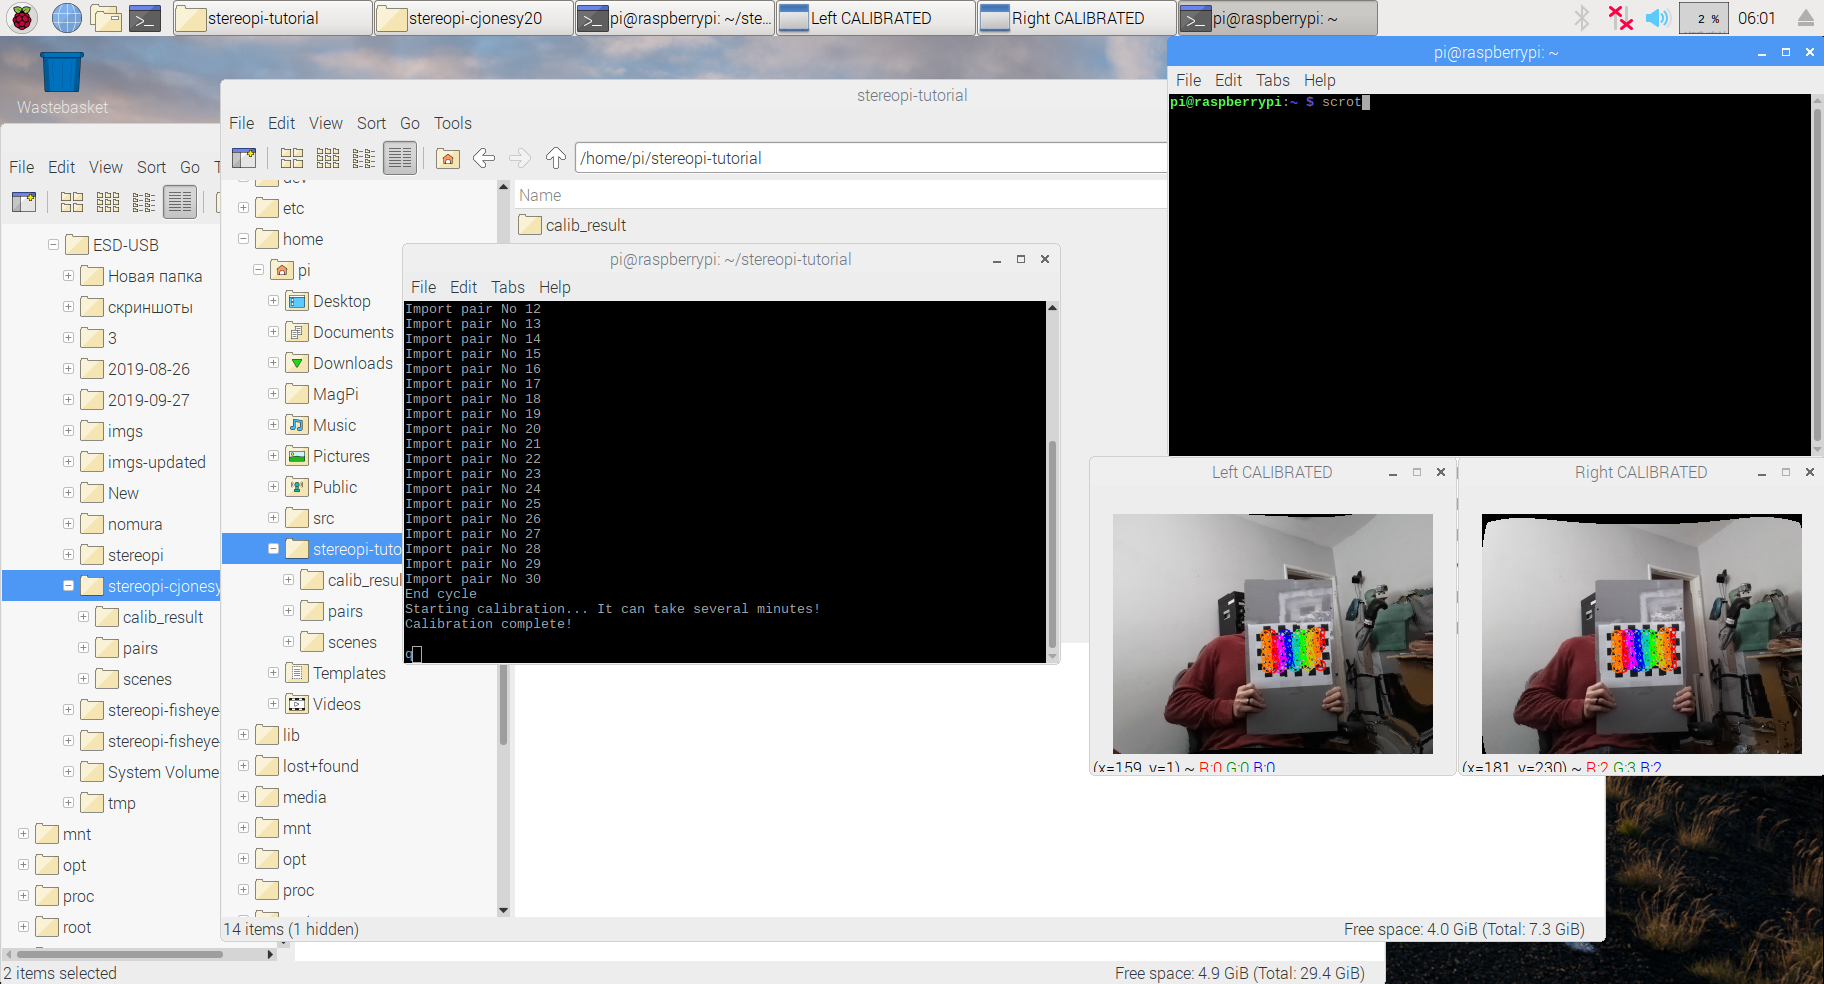
It means that with the default setting this calibration works fine. But let's look into details.
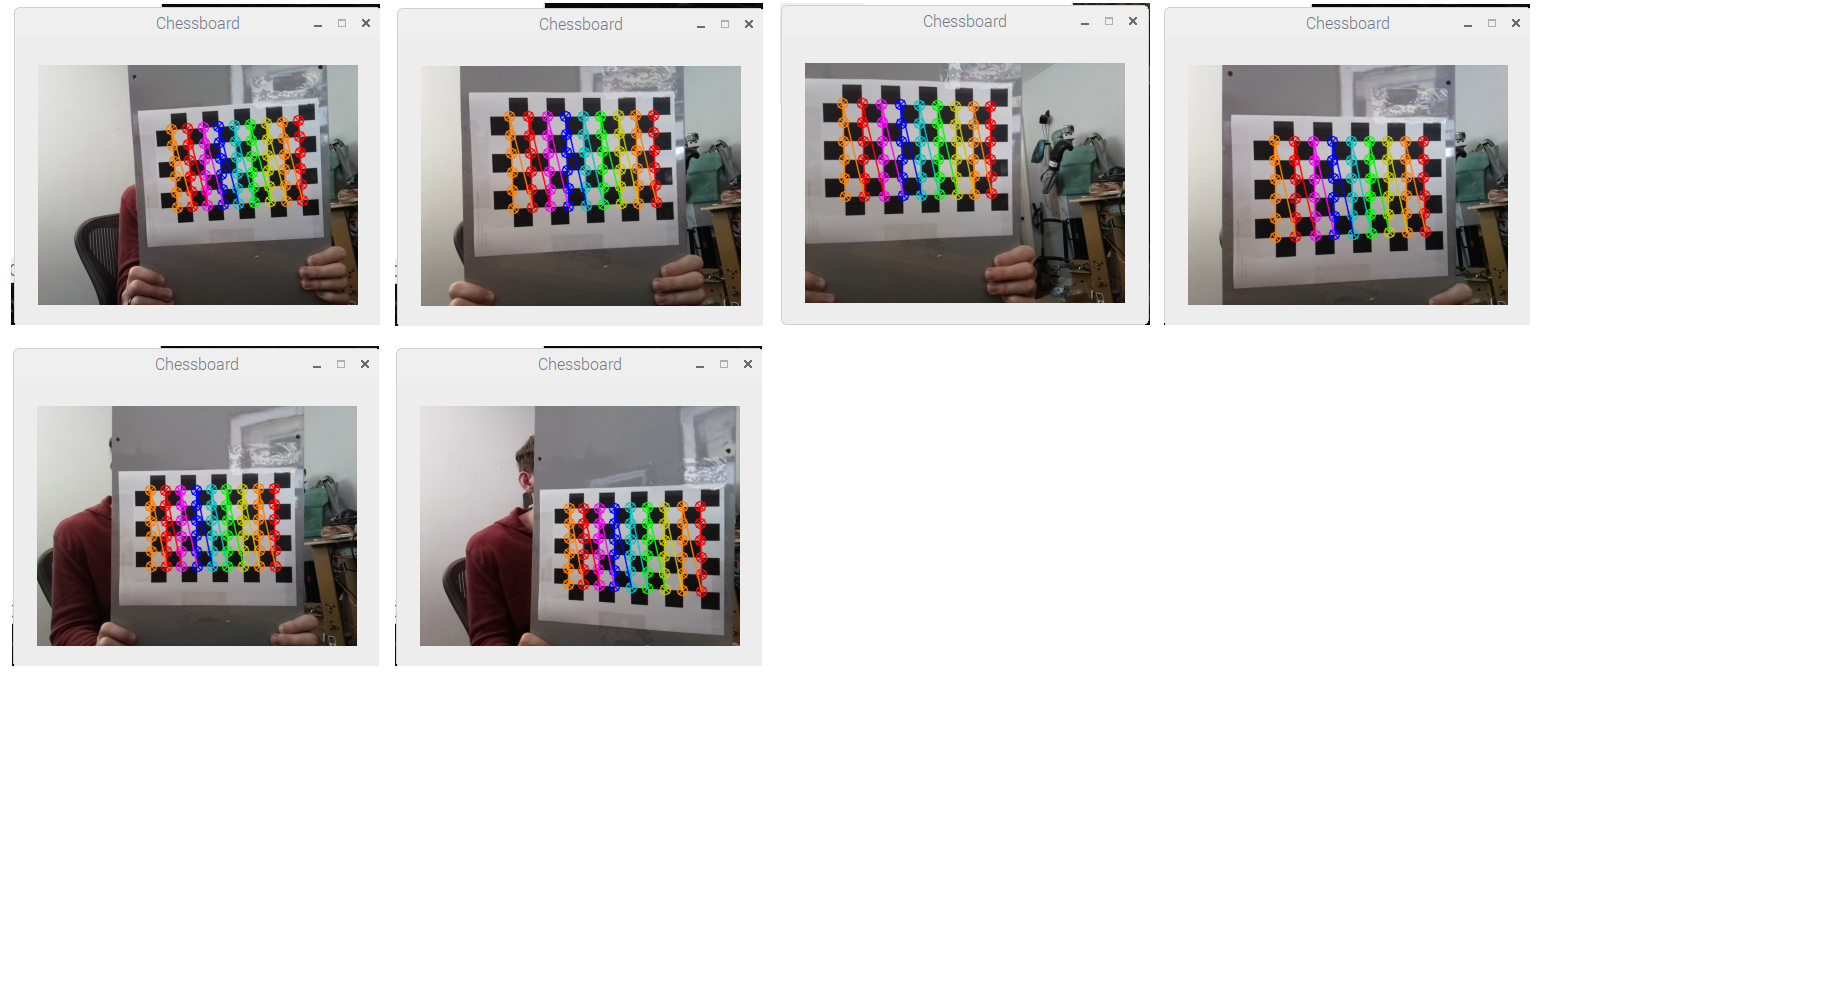
3. Chessboard detection
4th script shows you calibration images while processing folders, and also shows corners detected. This is a critical point, and you should look at these images to control quality. If chessboard is detected wrong, this will affect on calibration quality. I recommend to delete images with wrong corners detection.
I did a series of screenshots and combined some "good" and "bad" images for comparison.
Here are the samples with "good" detection:
(Link to full-res image: http://stereopi.com/sites/default/files ... sboard.png)
And some "bad" detection samples:
(Link to full-resolution image: http://stereopi.com/sites/default/files ... sboard.png)
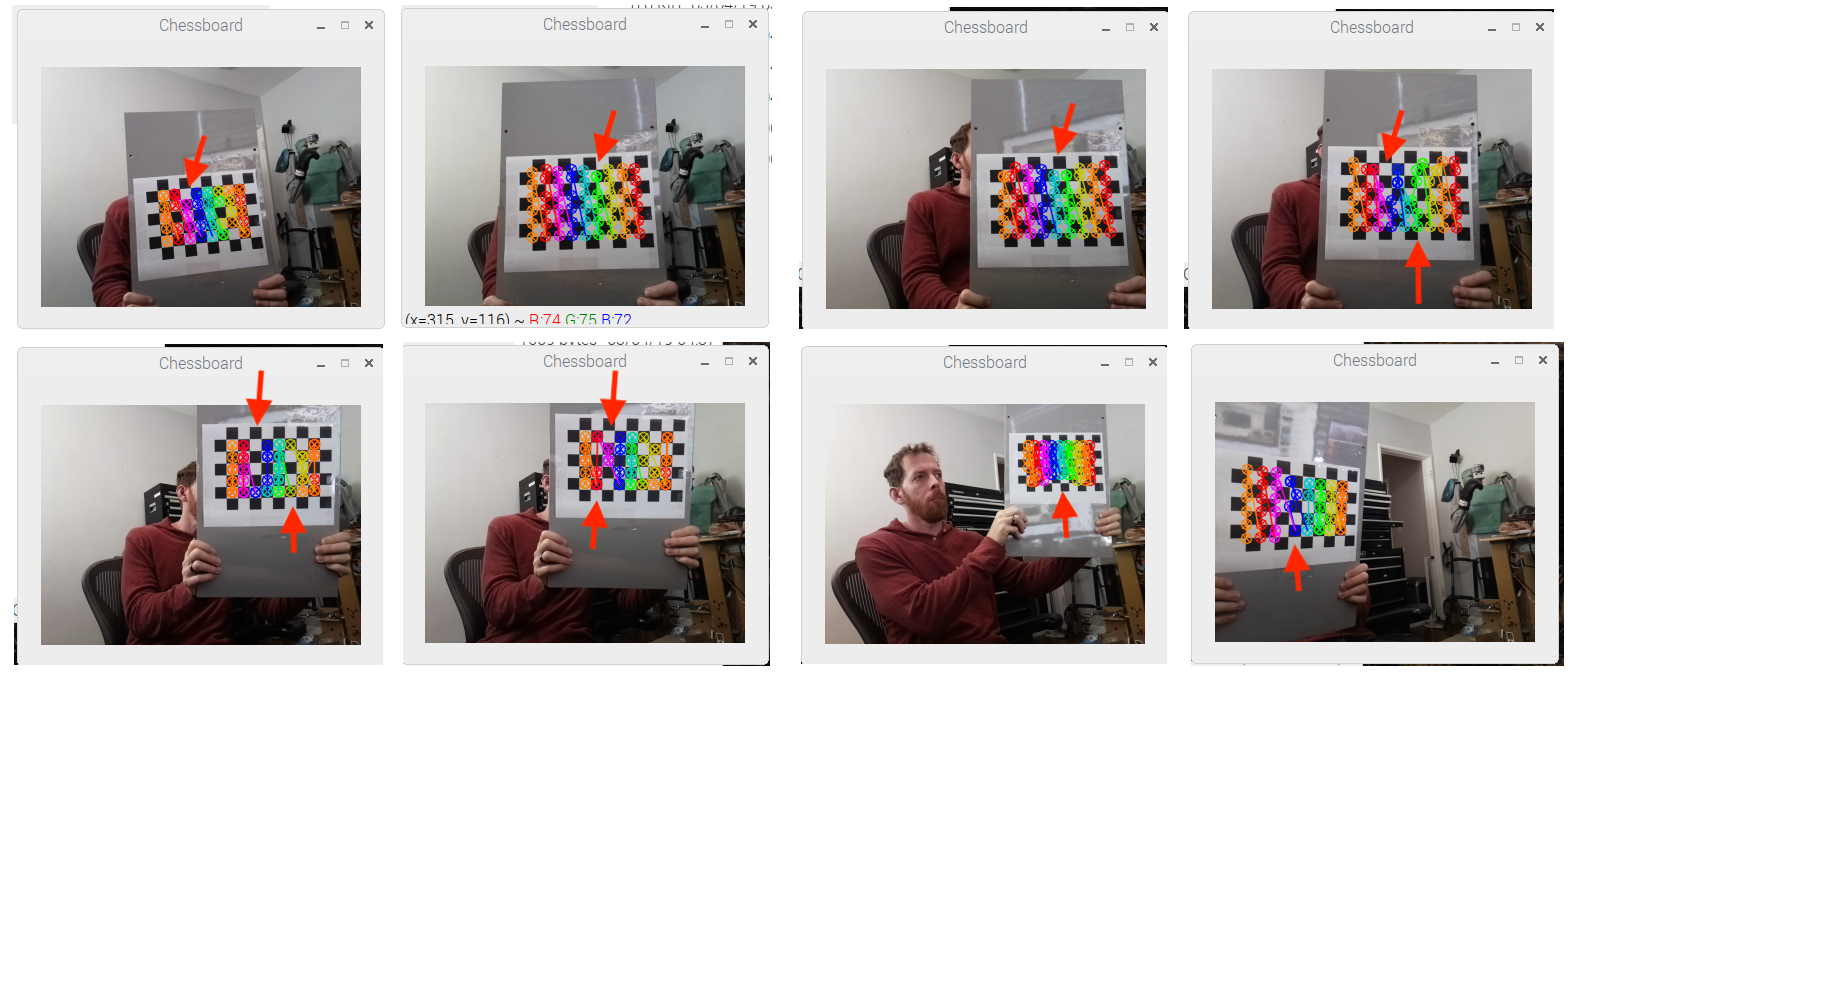
You may find, that on "bad" detections some corners was not found, or found in a wrong place. Also colors lines sometimes are not straight, but zig-zag like.
In spite of this wrong detections, final result is acceptable.
As for calibration we use a low resolution, I'd recomment you to keep board closer to the cameras.
If you wish to analyze all images I mentioned, you can download this ZIP file with all screenshots. You can find a name of every image (printed by 4th script in the terminal) and also image itself.
This is the first part of my answer.
As I have a lot to say, let me post my answer in a several consequent posts here.
1. Experiment conditions
For this test I used micro SD with fresh-recorded image downloaded here.
This image contains code from https://github.com/realizator/stereopi-tutorial, and here is related article in our blog.
I DID NOT change any code. I just deleted both "pairs" and "scenes" folders with images, and put two these folders from your link.
2. After step 1:
I did "cd stereopi-tutorial" and run this command:
Code: Select all
4_calibration.pyHere is a full screenshot:
It means that with the default setting this calibration works fine. But let's look into details.
3. Chessboard detection
4th script shows you calibration images while processing folders, and also shows corners detected. This is a critical point, and you should look at these images to control quality. If chessboard is detected wrong, this will affect on calibration quality. I recommend to delete images with wrong corners detection.
I did a series of screenshots and combined some "good" and "bad" images for comparison.
Here are the samples with "good" detection:
(Link to full-res image: http://stereopi.com/sites/default/files ... sboard.png)
And some "bad" detection samples:
(Link to full-resolution image: http://stereopi.com/sites/default/files ... sboard.png)
You may find, that on "bad" detections some corners was not found, or found in a wrong place. Also colors lines sometimes are not straight, but zig-zag like.
In spite of this wrong detections, final result is acceptable.
As for calibration we use a low resolution, I'd recomment you to keep board closer to the cameras.
If you wish to analyze all images I mentioned, you can download this ZIP file with all screenshots. You can find a name of every image (printed by 4th script in the terminal) and also image itself.
This is the first part of my answer.
Eugene a.k.a. Realizator
-
Realizator
- Site Admin
- Posts: 900
- Joined: Tue Apr 16, 2019 9:23 am
- Contact:
Re: rotate video 180 degrees?
Next part.
As you know, we have some newer code, posted here https://github.com/realizator/stereopi-fisheye-robot
Please notice, that for this experimrnt I've used new Buster OpenCV image. You can find this link in GitHub repo too.
I can suggest, that having V2 cameras you think, that this "fisheye" code is not your case. Actually this code works for the "classic FOV" cameras too, AND support fisheye cameras.
As I mentioned in related article, this code has some important updates, like "all code inside" instead of using external calibration libraries. Also we used some tricks to increase calibration quality.
So I decided to suggest your images as an input for this code.
One notice. For improving chessboard detection quality we use a trick. For finding chessboard corners we use images with twice bigger resolution, and after that we decrease both X and Y coordinates of every corner twice, and use that data. So 4th script in this repo actually uses images with bigger resolution (taken in script 2_chess_cycle.py).
But your set has lower resolution, so to make your images set "compatible" I've commented this tricky code. I mean rows from 124 and up to 131.
Here is a screenshot before commenting:
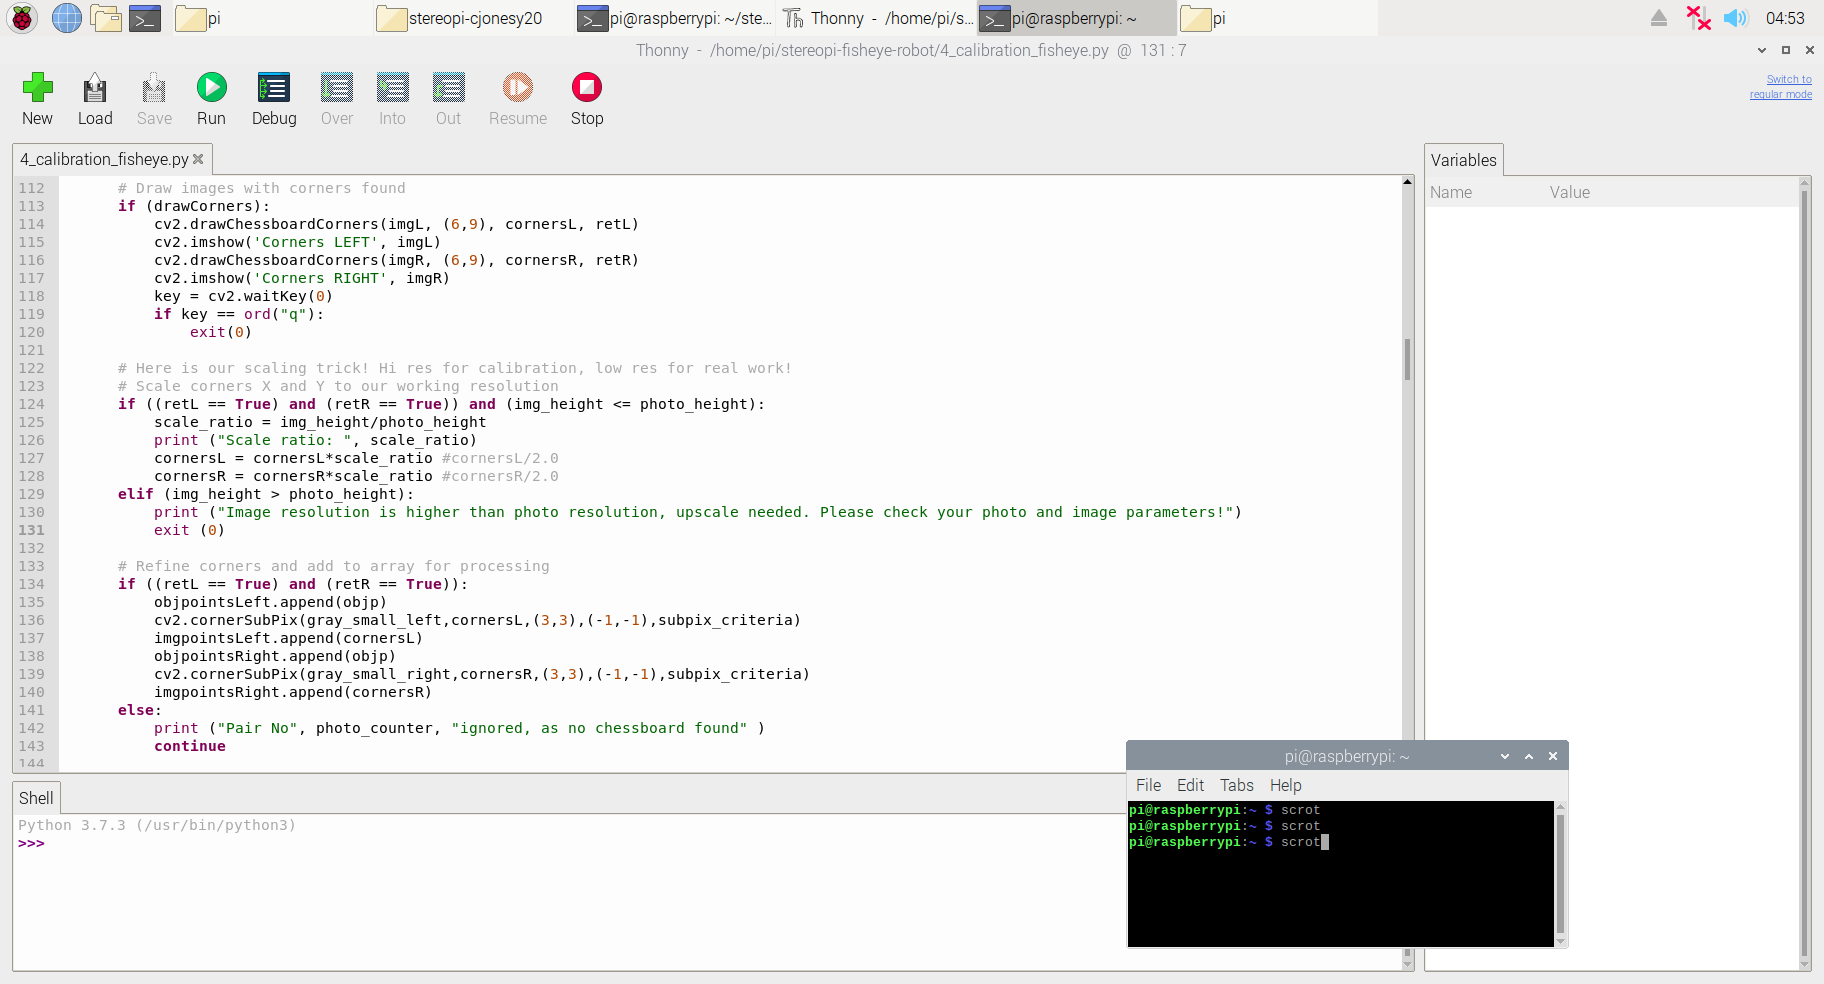
And screenshot after:
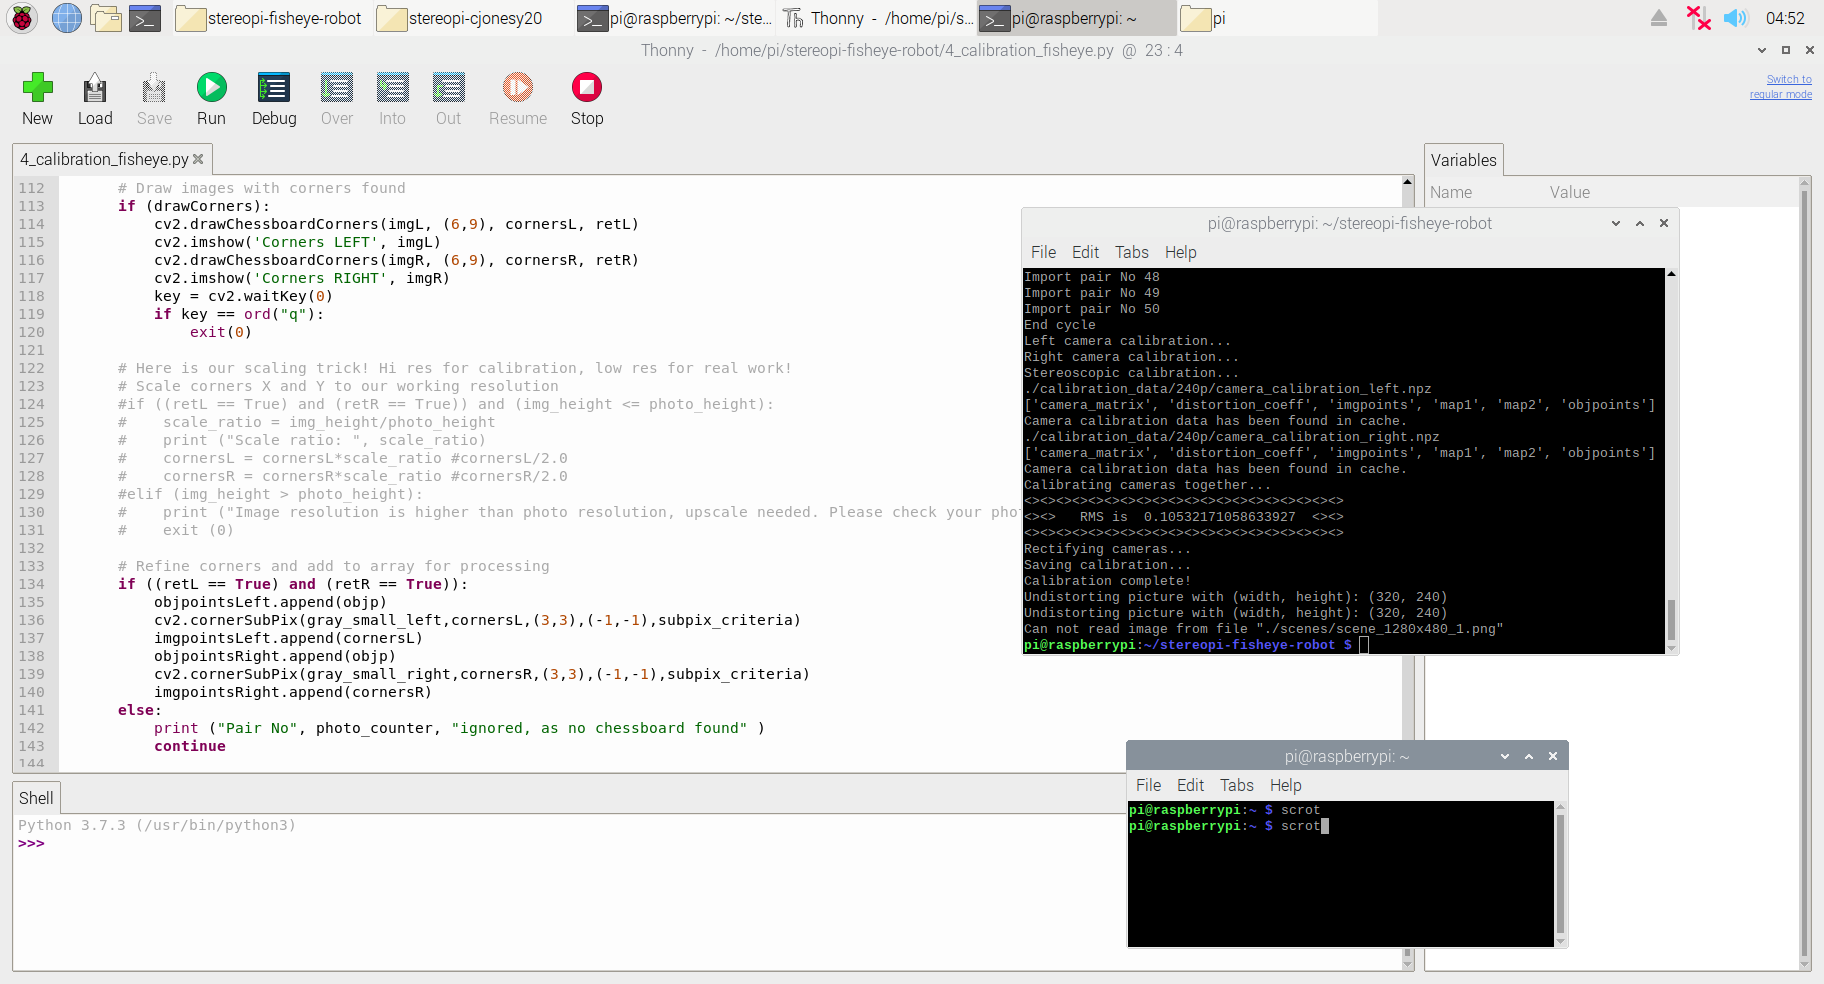
Also original version of this script use file name "scene_1280x480_1.png" in a row 58 to show you final result. I changed it to "scene_640x240_1.png"
And here is the result of fisheye-enabled calibration:
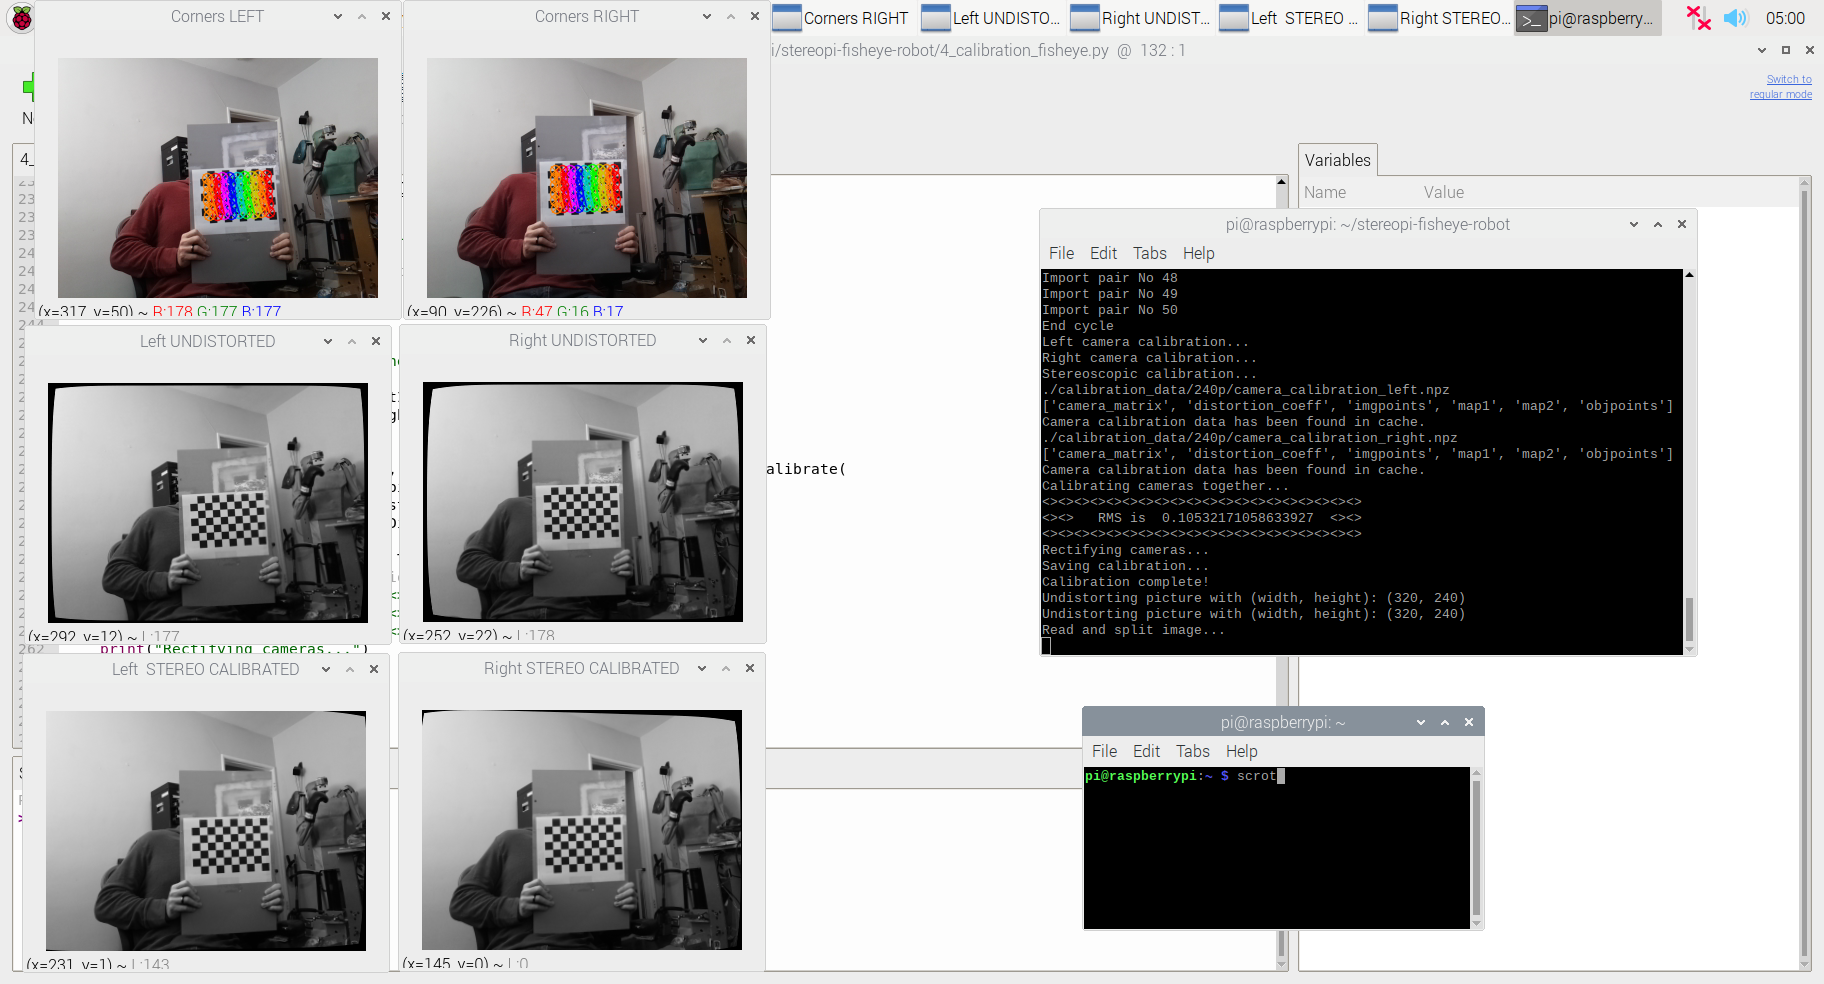
Full resolution image: http://stereopi.com/sites/default/files ... _scrot.png
First line with the 2 images shows last two chessboard detections.
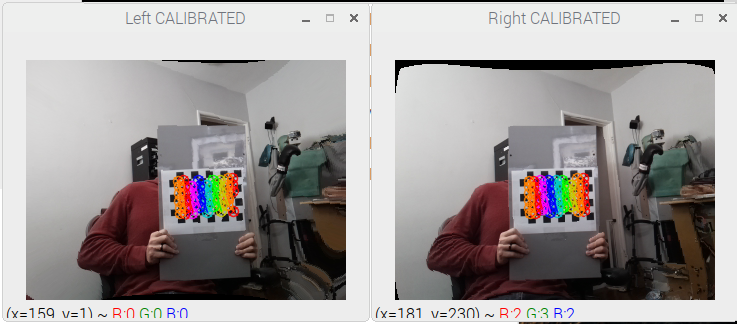
Second line with 2 images (Left_UNDISTORTED and Right_UNDISTORTED) shows you images after removing fisheye distortion. It's fun, but actually even V2 cameras has a small fisheye distortion
And the last line with 2 images (Left STEREO CALIBRATED and Right STEREO CALIBRATED) shows you two images, rectified as a stereopair.
Brief conclusion: you may use our newest fisheye code to work with your non-fisheye cameras!
As you know, we have some newer code, posted here https://github.com/realizator/stereopi-fisheye-robot
Please notice, that for this experimrnt I've used new Buster OpenCV image. You can find this link in GitHub repo too.
I can suggest, that having V2 cameras you think, that this "fisheye" code is not your case. Actually this code works for the "classic FOV" cameras too, AND support fisheye cameras.
As I mentioned in related article, this code has some important updates, like "all code inside" instead of using external calibration libraries. Also we used some tricks to increase calibration quality.
So I decided to suggest your images as an input for this code.
One notice. For improving chessboard detection quality we use a trick. For finding chessboard corners we use images with twice bigger resolution, and after that we decrease both X and Y coordinates of every corner twice, and use that data. So 4th script in this repo actually uses images with bigger resolution (taken in script 2_chess_cycle.py).
But your set has lower resolution, so to make your images set "compatible" I've commented this tricky code. I mean rows from 124 and up to 131.
Here is a screenshot before commenting:
And screenshot after:
Also original version of this script use file name "scene_1280x480_1.png" in a row 58 to show you final result. I changed it to "scene_640x240_1.png"
And here is the result of fisheye-enabled calibration:
Full resolution image: http://stereopi.com/sites/default/files ... _scrot.png
First line with the 2 images shows last two chessboard detections.
Second line with 2 images (Left_UNDISTORTED and Right_UNDISTORTED) shows you images after removing fisheye distortion. It's fun, but actually even V2 cameras has a small fisheye distortion
And the last line with 2 images (Left STEREO CALIBRATED and Right STEREO CALIBRATED) shows you two images, rectified as a stereopair.
Brief conclusion: you may use our newest fisheye code to work with your non-fisheye cameras!
Eugene a.k.a. Realizator
-
Realizator
- Site Admin
- Posts: 900
- Joined: Tue Apr 16, 2019 9:23 am
- Contact:
Re: rotate video 180 degrees?
cjonesy20, if any of my suggested steps works for you?
Eugene a.k.a. Realizator